Sound-Activated LED with Raspberry Pi
Sound-Activated LED with Raspberry Pi
Looking for an engaging DIY electronics project? This sound-activated LED project using a Raspberry Pi is perfect for beginners and enthusiasts alike. The LED lights up whenever the sound sensor detects a sound above a set threshold, like a clap or a voice. Let’s dive in and create this fun and useful project!
Components Needed
- Raspberry Pi (any model)
- Breadboard
- Male-Female Jumper Wires (5)
- Sound Sensor Module
- 220Ω resistor
- LED (1)
Project Overview
The sound sensor module used in this project outputs a digital signal, making it easy to determine if the detected sound exceeds the set threshold. Adjust the threshold by rotating the trimmer potentiometer on the sensor module. Clockwise increases sensitivity; counterclockwise decreases it. Adjust the sensor’s sensitivity if the LED does not respond to loud sounds.
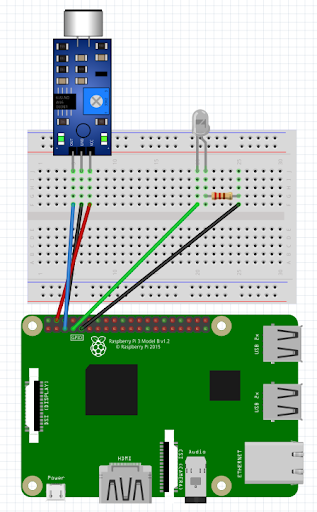
Wiring the Components
The wiring for this project is straightforward:
- Sound Sensor Module: Connect the VCC pin to 5V (Pin 04) on the Raspberry Pi, GND pin to GND (Pin 06), and the OUT pin to GPIO3 (Pin 05).
- LED: Connect a 220Ω resistor in series with the LED’s cathode (negative) pin, then connect the resistor to GND (Pin 09) on the Raspberry Pi. Connect the anode (positive) pin of the LED to GPIO4 (Pin 07).
Remember to refer to a Raspberry Pi pinout guide to ensure correct connections.
The Code
Open your preferred Python IDE on the Raspberry Pi (we’ll use Thonny in this example). Here’s the code to get started:
| |
Code Explanation
- Import the GPIO Module: This allows us to control GPIO devices with the Raspberry Pi.
- Set Up GPIO Warnings and Mode: Disable warnings and set the pin numbering mode to BCM (Broadcom SOC channel).
- Initialize Pins: Set GPIO pin 3 as an input (connected to the sound sensor) with a default pull-down resistor, and GPIO pin 4 as an output (connected to the LED).
- Main Loop: Continuously check the sensor’s input. If it detects sound (sends a HIGH signal), the LED turns on, and a message is printed. If no sound is detected, the LED remains off, and a different message is printed. The loop repeats every 100 milliseconds.
Conclusion
Congratulations! You’ve just created a sound-activated LED using a Raspberry Pi. This simple yet fascinating project introduces you to the basics of working with sensors and LEDs, and it can be expanded for more complex applications. Happy making!
References:
- https://www.electorials.com/pi-project-005-raspberry-pi-sound-activated-led.html
- https://www.raspberrypi.com/documentation/computers/getting-started.html#setting-up-your-raspberry-pi
- https://www.digikey.in/en/maker/projects/how-to-make-a-raspberry-pi-voice-activated-door-lock/77508022b7d64df0955fb793f04af5be